

How to Sand Cast Fire in Place Cultured Opals
Sand Casting Healing Phoenix Lapidary Fire in Place Cultured Opals transforms an ancient jewelry-making technique into modern, mesmerizing art. This timeless method utilizes jeweler’s sand to craft molds, with materials like Delft clay and even beach sand contributing to the unique textures. Each casting is a custom-made creation, allowing artisans to produce one-off pieces without resorting to outsourcing to casting houses.
When it comes to sand casting stones, it’s a tricky business. Stones can crack or shift, and there are no guarantees. I went to Nadine Citerne of Nadine Suzanne Jewellery, a generous and trusted educator specializing in sand casting. Drawing inspiration from the ocean, Nadine’s sand cast jewelry often incorporates beach sand, resulting in remarkable textures and organic details that stand apart. Nadine was thrilled with the challenge of trying and proof-testing the Cultured Fire in Place Opals. She put the Cultured Opals through the paces with meticulous testing, and the successful pieces she created are beautiful.
Let’s take a deep dive into the
Sand Casting Process.
Different Models Can Be Used for Casting
Nadine often employs wax models fashioned to allow 0.5mm of space for the metal to flow behind and secure the stone. A master, usually made of a durable substance such as wood, plastic, or metal, is created. Another possibility is found objects such as beach shells and metal or plastic buttons.
A flask, packed tightly with the jeweler’s sand, is used to capture all the details of the master when pressed into it. Common designs used in Sand Casting include cast rings, pendants, and bezel rings.
Sand Utilized in Testing the Cultured Opals
Nadine used:
-
Red Clay from DIY Castings and
-
Delft Clay from most jewelry supply stores.
Sand Casting Flask
This specially open-ended container comprises two parts; a male and female part holds the sand and supports the mold. The male side has a protruding lip and vent holes.
Filling the Flask with Sand
The male side of the flask is filled and leveled off with sand from behind, using a hammer.
Inserting the Wax Model
Pressed halfway into the sand, the wax model is brushed with baby powder to prevent sticking.
Filling the Female Side of the Flask with Sand
The female side of the flask is placed on the male side, and the sand is packed tightly from behind to capture all the mold detail and level off.
Removing the Wax Mold
The flask is carefully separated so as not to disturb the impression created in the sand by the model. Then, the wax model is carefully removed, leaving a cavity for the metal.
Creating Sprue and Vents
A Sprue and funnel are created to transport metal poured into the mold. The sprue and funnel join to the recess created by the wax mold, and the funnel is designed to pool any excess metal.
Vent holes are added to assist in allowing the gas to escape. The vent holes also serve as a vacuum, drawing the metal down.
Pouring the Molten Metal
Using a Smith Little Torch, metal is heated until molten and poured into the opening you made above, filling the negative space created by the mold. It is then allowed to cool into the desired shape.
It is noteworthy to mention that the most common type of torches used are MAPP gas bottles—these are handheld torches, but they don’t melt the silver as quickly as the Smith torch.
There are two types of Flasks: Top Pour and Side Pour
-
Top Pouring metal into the flask is commonly used for pendants and flat objects, and
-
Side Pouring metal into the flask is typically used for rings.
Extracting the Casting
Once the metal has solidified, the mold is immediately opened, and the raw cast is extracted and set aside to cool. Due to the risk of thermal shock to the Cultured Opals, it is allowed to cool naturally.
If there are no stones set in the piece, it can be quickly cooled in water.
Now for the Fun Part Sand Casting Fire in Place Cultured Opals
Cultured Opal Preparation
Once the mold is created, the Healing Phoenix Lapidary Cultured Opals are meticulously cleaned and placed within the cavity. Each Cultured Opal is coated with a thin layer of pawpaw ointment (petroleum jelly) on the table to prevent movement during the process. However, keep in mind that when sand casting with stones in place, there’s no guarantee that the stone will stay perfectly positioned or even survive the process. The ‘cast in place’ technique gives each piece a unique, rough, and organic feel.
Casting Cultured Opal Placement
All Cultured Opals have pawpaw ointment applied to their tables to prevent them from shifting in the mold. After the casting, the rings were not quenched in water, but left to cool naturally, avoiding the risk of thermal shock.
Cultured Opals Used in Casting
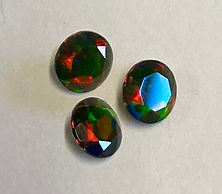
Both faceted and cabochon Cultured Opals were put to the test. Faceted Opals ranging from 3 to 6 mm in size were successful. However, some cabochons did not withstand the process. Interestingly, the shallow 4 x 6 mm ‘Cool Mint’ Cultured Opal Cabochon did survive, likely due to its shallow depth. Cabochons are generally less favored in sand casting or lost wax methods because they are poor conductors of heat and prone to thermal shock during rapid heating or cooling.


Working with Fire in Place Cultured Opals
Handling
Cultured Opals are rated 6 - 7 on the Mohs scale, making them slightly more durable than Natural Opals, which are 5 - 6.5, but they still need to be handled with care. Opals are commonly used in necklaces, rings, and earrings. Poorly designed pieces may lead to scratching, cracking, or breaking due to force. For instance, rings experience a lot of wear and tear. Consider whether the gem might come into contact with other objects while in its setting, like accidentally knocking it against tools or counters. It's wise to set the Opal deeply in the design to prevent any contact with the stone's surface.
Tumbling in a Tumbler
Use Grafix® Incredible White Mask Liquid Frisket to protect and cushion the stone from damage in a tumbler. Apply the Frisket with a pin tool or small stylus, covering the stone's front and back. Once dry, it should look cloudy-translucent. After tumbling, peel off the Frisket and wipe off tools immediately after use. This technique works with any rotating, vibrating, or magnetic tumbler with stainless steel shot. Check the Frisket after 30 minutes; if it has come off, apply more. Avoid using coarse mediums like Hone and Shine, which can quickly remove the Frisket.
Using a Patina such as Liver of Sulfur
Liver of Sulfur (LOS) doesn't affect the stone itself, but it may alter the appearance of translucent stones. Test the color effect by placing the stone on different backgrounds. Some prefer the look of the darkened metal. Use Grafix® Incredible White Mask Liquid Frisket as a resist to prevent LOS from getting on unwanted areas. Cultured Opals are sensitive to extreme temperature changes, so use warm, not hot, water for the LOS solution. Allow the piece to reach room temperature before rinsing in cold water to avoid thermal shock.
Rotary Tool Finishing
Use quality masking tape to protect the Cultured Opal. Burnish the tape down firmly before using a rotary tool for polishing. These Opals are more resilient than natural opals, but abrasive wheels can dull their shine. If scratched, a muslin wheel with diamond paste can remove minor scratches if not too deep.
Recommendations for Success
While there are no absolute guarantees with sand casting, there's significant evidence that success is achievable with Cultured Opals, even when others in the sand casting field had doubts.
Cabochons vs. Faceted Stones
Faceted stones, with their multiple flat surfaces, are easier to position and hold in place than cabochons due to their smooth, curved surface, which makes securing them in the mold difficult. Cabochons are also more sensitive to high temperatures in sand casting, leading to a higher risk of thermal shock and cracking because they are poor conductors of heat and can suffer from rapid heating or cooling.
Best Sizes
The best stone sizes to work with are 2 – 5 mm, though a 6 mm worked fine.
Tool Care When removing metal around the stone, be careful with your tools, including the popular graver. Use a protective barrier, such as several layers of masking tape over the stone, to prevent accidental scratches or chips.
Properties of Opals
Natural Opals are not suitable for sand casting as they would not survive. Also, keep in mind that not all cultured or lab-grown opals have the same properties or are heat resistant. Read their descriptions carefully; they should not contain polymers or resin. Healing Phoenix Lapidary Opals have been tried, true, and tested in this process.
Methods of Sand Casting and Conclusions

Healing Phoenix Lapidary Bermuda Ocean Round Faceted Cultured Opal (6mm)
-
The metal used was Sterling Silver
-
The Casting Method was Core Casting/Vacuum Table
-
The mold was not heated
-
There was no damage to Opal
-
There were no color changes to the Opal
Conclusion: I would cast with this Cultured Opal
Special Notes: When the ring was initially removed from the flask, the Cultured Opal had a dull appearance. However, after cleaning it, it looked like it did initially. It was very pretty and had lots of flash.

Healing Phoenix Lapidary
Pink Blush Round Faceted Cultured Opal (3mm)
-
The metal used was Sterling Silver
-
The Casting Method was a standard side pour flask
-
The mold was not heated
-
There was no damage to Opal
-
There were no color changes to the Opal
Conclusion: I would cast with this Cultured Opal
Healing Phoenix Lapidary Black Fire Round Faceted Cultured Opal (5mm)
-
The metal used was Sterling Silver
-
The Casting Method was Core Casting/Vacuum Table
-
The mold was heated
-
Damage to Opal: Yes
-
Color Change: None
Conclusion: I would cast with this Cultured Opal because the color is amazing. I’d like to try again without heating the mold.
Note: When I removed the ring from the mold, the opal looked good, with no visible issues. However, I used a graver to expose it more, which caused it to crack. I tried to avoid applying pressure, but maybe the opal was already fragile from the casting process, and my actions contributed to the Opal's injury.
Nadine Citerne of Nadine Suzanne Jewellery shows how to sand cast Cultured Opals in Place.
Educational Resources:
Sand Casting and Fire in Place Cultured Opal Education: www.HollyGage.com
Sand Casting and Fire in Place Cultured Opal Education: www.HealingPhoenixLapidary.com
Sand Casting information videos and education: www. NadineSuzanneJewellery.com and www.instagram.com/nadinesuzannejewellery/
Casting Supplies and Red Clay: www.diycastings.com
I am thrilled to announce that my pioneering work with Heat Resistant Fire in Place Cultured Opals has been recognized by the Alliance for Metal Clay Arts Worldwide (AMCAW) with the prestigious Innovation Grant Award. This accolade celebrates our breakthrough in developing advanced firing techniques for Fire in Place Cultured Opals in jewelry.
In addition to this honor, I am deeply humbled to be a presenter at The Jewelry Symposium for the Advancement of Jewelry Manufacturing Technology. My paper, along with the entirety of my research, will be published, sharing our innovative findings with the global jewelry community.
I extend my heartfelt gratitude to Nadine Citerne for her unwavering collaboration and support in advancing sand casting techniques with Cultured Opals. Her dedication and expertise have been invaluable in pushing the boundaries of what is possible in our field.


